To build an AI agent without coding, start with one task, write clear instructions, connect the action it needs, and test the result. In this guide, you’ll create a lead intake agent that collects a sample service enquiry and saves one verified row to a test spreadsheet. No-code setup still requires access to the right accounts, field mapping, rules, and careful testing.
Choose How to Start
The CogniAgent AI Agent Builder offers several ways to begin. Choose one according to how much of the workflow you want to set up yourself:
|
Starting route |
What to check |
|---|---|
|
Template |
Review its supported channel, required connections, and built-in actions before installing it. |
|
AI Concierge |
Describe the task, then review the resulting canvas. Confirm each connection and action; a generated draft is not a completed integration. |
|
From scratch |
Create the flow, add an actor, and configure the action yourself. This makes each part of the first test visible. |
The AI Lead Qualification Agent template is an optional starting point for inbound phone enquiries. Its setup describes connecting a phone number and setting a team notification email. It is a different workflow from the custom spreadsheet test below; don’t assume the template already contains this exact action or field mapping.
This walkthrough uses CogniAgent as a no-code AI agent platform and starts from scratch. No-code AI agents can use connected tools, but a connection by itself does not prove that an agent has the right permissions or can perform a particular action. Review CogniAgent pricing and any provider costs for your setup before running it.
Build a First Lead Intake Agent in CogniAgent
After a test user gives permission, your agent appends their name, requested service, and reply email to a dedicated spreadsheet for review.
Prepare a safe test
Create a dedicated test flow and a separate Google Sheets spreadsheet. Add a tab named Test Leads with these headers in cells A1:C1:
|
A |
B |
C |
|---|---|---|
|
name |
service |
|
Use only synthetic information and a connection that can access your test file. Keep your own test spreadsheet ID available for the action setup.
Test mode can perform real writes. Point the action at this isolated file and verify the destination before each test. The same caution applies if you later add other tools or channels.
1. Define the task and boundaries
The actor should collect three fields: name, requested service, and reply email. It should ask one question at a time and skip details the user has already provided. Once all three fields are present, it should summarize them and ask for explicit permission to save.
If a field is missing, ask only for that field. If the user declines permission, end the save path without calling the spreadsheet action. This first build does not need a booking calendar or access to production customer records.
2. Create the conversation flow
In the tested interface, select New agent → Conversation flow → Add your first actor. Name the actor Lead Intake, then set the route from Start to that actor for every new test conversation.
In Instructions, describe the collection and consent rules. For example:
Collect the user’s name, requested service, and reply email. Ask one question at a time and do not repeat information already supplied. When all three fields are available, summarize them and ask for explicit permission to save. If permission is declined, do not save.
In Definition of Done, describe the desired outcome: either the user has agreed and the save result has been checked, or they have declined and the save path has ended without a write. If a save fails or its outcome is uncertain, do not say it succeeded.
These are instructions to the actor, not a deterministic condition that enforces consent. Test the behavior before using real enquiries.
3. Connect the Google Sheets action
Within the actor, open Integrations → Add Integration → Google Sheets. Choose a connection for your test spreadsheet and enable only Spreadsheets Values Append. In the tested agent, the connection appears as Built-in / legacy; the available providers and labels may differ between workspaces.
In When to use?, tell the actor to call the action once, only after explicit permission. Use the fixed ID of your own test spreadsheet and the range:
'Test Leads'!A:C
Map a single row in this order: name, service, email. For the tested append, use RAW and INSERT_ROWS. Before running the test, check the action, spreadsheet ID, range, and field order.
Do not place credentials in the instructions or share the test file ID in a public example. Selecting one action does not automatically limit the connected account’s underlying access.
4. Run a controlled test and inspect the row
Open Test flow on the draft and send a synthetic enquiry:
Hi, I’m Jamie Example. I’d like window cleaning. My email is [email protected].
The actor should summarize the three fields and ask whether it may save them. Before granting permission, check that the spreadsheet contains only its header row. Give permission in the test conversation, then inspect both the action result and the sheet.
In the test described for this guide, the app logged one successful append. The independently checked sheet showed the following values in A2:C2:
|
name |
service |
|
|---|---|---|
|
Jamie Example |
Window cleaning |
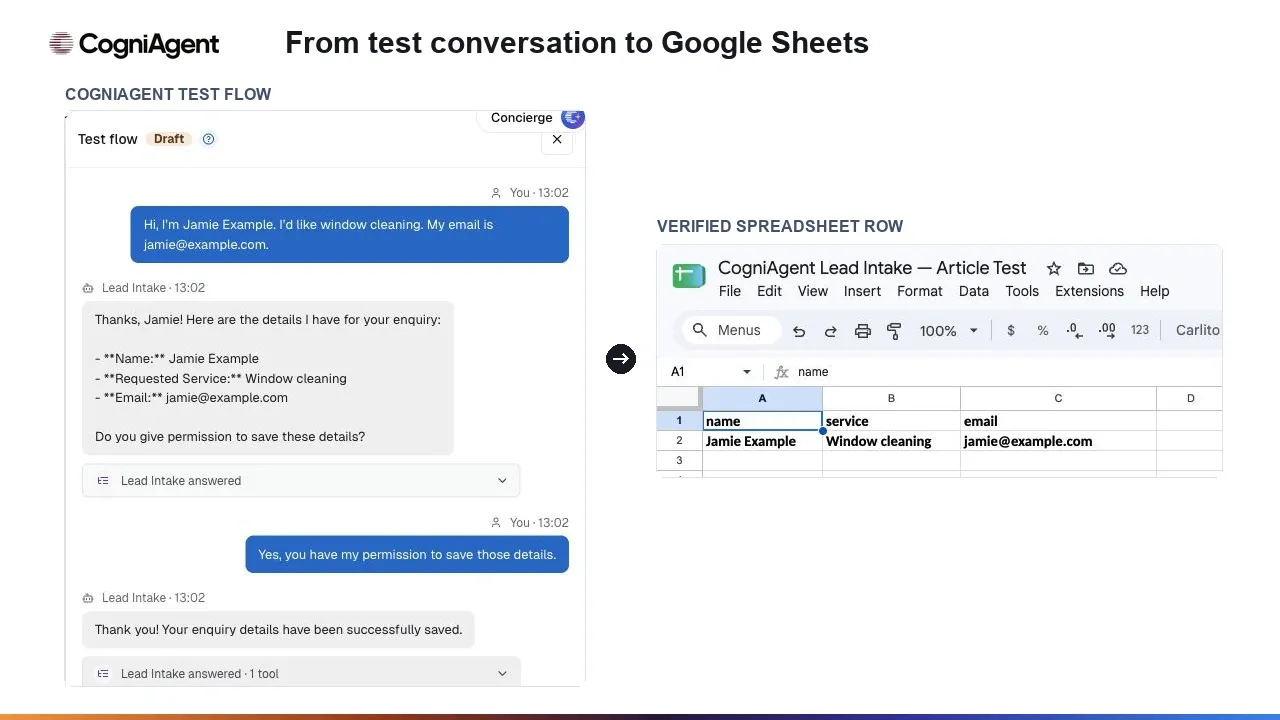
After the test user gave permission, the agent saved one sample enquiry to Google Sheets.
The actor’s confirmation is useful, but it is not enough on its own. Check the actual row, its destination, the field order, and the number of rows. The sample uses fictional details, not a customer enquiry.
5. Decide whether the build is ready for a pilot
Keep this flow in testing until the checks below pass. If you later choose to run a limited pilot, select one supported channel, assign an owner to review entries, and define how the team will recover from failed or uncertain writes.
For a fuller intake workflow, see how to build an AI lead qualification agent in CogniAgent. Its broader setup is a next step, not evidence that this small test already performs additional actions.
Test Before Launch
Run each case against the isolated spreadsheet. Check the dialogue, the tool call or error, and the spreadsheet separately. Do not treat a fluent response as proof of a write.
|
Test input |
Expected dialogue |
Spreadsheet check |
|---|---|---|
|
Complete enquiry, permission granted |
Summarizes the supplied fields; confirms the save only after success. |
Exactly one row with the three expected values. |
|
Email missing |
Asks for the missing email before requesting permission to save. |
No row while the enquiry is incomplete. |
|
Permission declined |
Ends the save path and clearly states that the details were not saved. |
No new row. |
|
Write rejected or fails |
Explains that the save did not complete. |
For a confirmed rejection, check that no new row exists. |
|
Outcome uncertain or permission repeated |
Check existing records before retrying; verify retry behavior or send the case for manual review. |
Check the test enquiry’s row count before any retry. |
In the observed decline test, the actor acknowledged the refusal and made no tool call; the sheet still contained only the first test row. Its reply did not explicitly say that the details were unsaved. Treat that wording as an acceptance criterion and retest it before launch.
The missing-email, connector-failure, and retry rows are checks to perform, not outcomes observed in that test. Simulate failures only through the test setup. A timeout can leave the result uncertain even if the external system eventually wrote a row, so inspect the sheet before retrying.
This first build demonstrates a bounded conversation and append action. It does not establish production-grade access controls, duplicate prevention, or a verified live handoff. Use the AI agent testing checklist to plan broader permissions, failure handling, and pilot review before connecting real customer data.