How to Build an Instant Inbound Response Workflow in CogniAgent: Capture Every Missed Call Before They Call Your Competitor
The phone keeps ringing. But you’re unavailable. You can’t answer – and that’s not a failure of effort. It’s just the reality of running a service business.
Here’s what happens next: 80% of callers won’t leave a voicemail. They hang up and call the next contractor on Google. That job – which could be worth $800 to $15,000 – is gone in under 30 seconds.
This isn’t a marketing problem. It’s a response time problem. The company that answers first doesn’t just get the job – they get the review, the repeat business, and the referral. Everyone else gets voicemail.
The Instant Inbound Response workflow fixes this without adding staff, changing your phone system, or asking anyone to be available 24/7. When a call goes unanswered, the workflow fires automatically – an SMS reaches the caller within 30 seconds, an AI handles the conversation, the lead is qualified, and a booking or callback is confirmed before they open Google again.
When a call goes unanswered, CogniAgent texts the caller within 30 seconds. If they reply, an AI qualifies the job and routes it – urgent jobs get an immediate tech alert, standard jobs get a booking offer, low-priority jobs get a follow-up. When the conversation closes, the owner is notified and the lead is logged to CRM.
No extra staff. No app for the customer. No change to how the business takes calls.
Verticals: HVAC, Plumbing, Roofing, Cleaning, Security, Restaurants, Hiring
Nodes: 11
Build time: ~60 minutes
Two things need to be in place before you open CogniAgent.
A Twilio SMS account with missed-call webhooks configured. CogniAgent doesn’t detect missed calls natively – Twilio does. When a call goes unanswered past the ring threshold, Twilio fires a webhook carrying the caller’s phone number to CogniAgent. Set a “no answer” fallback URL in your Twilio number settings pointing at this workflow. Three to four rings is the right threshold for most service businesses – configure this in your phone system, not in CogniAgent.
A Calendly account for booking. The standard booking path uses an HTTP Request node to hit the Calendly API directly and pull available slots. Connect your Calendly account and have your API credentials ready before configuring Path 2.
A CRM connected via App Action. The final two App Action nodes handle owner notification and CRM logging. Have your CRM app ready to connect – JobNimbus, ServiceTitan, HubSpot, or equivalent.
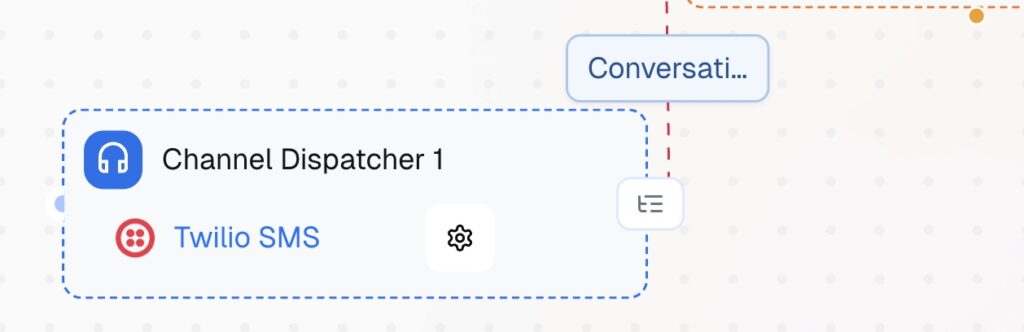
Node: Channel Dispatcher
Add a Channel Dispatcher node as your entry point. Open the node settings and configure the following:
Node Name: give it a clear label – “Channel Dispatcher 1” is the default, keep it or rename it to something like “Inbound SMS – Missed Call.”
Connection: click “+ Connect” and authenticate your Twilio account. Once connected, select it from the dropdown. This is the Twilio account that owns the phone number your clients call.
Sender Phone Number: once your Twilio connection is selected, choose the Twilio number used to receive calls and send SMS responses. This is the business’s inbound number.
Recipient Phone Number: click “Use Variables +” and map this to the caller’s number passed in from the missed-call trigger. This tells CogniAgent who to send the first SMS to.
Execution Mode: set to Initiator. This means CogniAgent starts the conversation proactively – it sends the first SMS to the caller rather than waiting for them to write in first.
Hit Save.
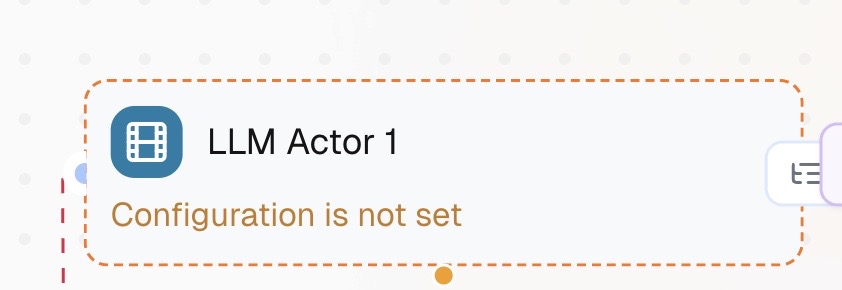
Node: LLM Actor
Add an LLM Actor after the Channel Dispatcher. Open the node settings and configure the following:
Node Name: rename it to something descriptive – “Instant SMS – Missed Call Reply” works well.
Model: select your preferred model from the dropdown. GPT-4o or Claude Sonnet are both reliable for this step.
System Instructions: this is where you write what the AI should do. Paste the following, adjusted for your client’s vertical:
“You are a friendly assistant for [Business Name]. A customer just tried to call and nobody answered. Send them one SMS: ‘Sorry we missed your call! What’s the issue and address? We’ll get back to you within 10 minutes.’ Wait for their reply. Do not send more than one message. Do not answer questions about pricing, availability, or scope of work.”
You can use “Use Variables +” to inject the business name or caller number dynamically if they are available from the trigger payload.
Exit Conditions: click “+ Add Condition” and define when this LLM should stop. Add one condition: “Customer has replied to the message.” This tells the LLM Actor to hand off to the next node once a reply arrives rather than continuing the conversation itself.
Built-in Skills: leave collapsed unless you need web search or similar – not required for this step.
Hit Save.
Node: Condition
Add a Condition node after LLM Actor. This node checks whether the caller replied to the SMS.
True path – customer replied: connects forward to LLM Actor 2 (job qualification).
False path – no reply after 5 minutes: connects to Send Message node, which fires a single follow-up nudge. After that the lead is logged and the workflow closes.
This is the only branching point based on customer behaviour before qualification begins. Everything from here forward assumes the caller has replied.
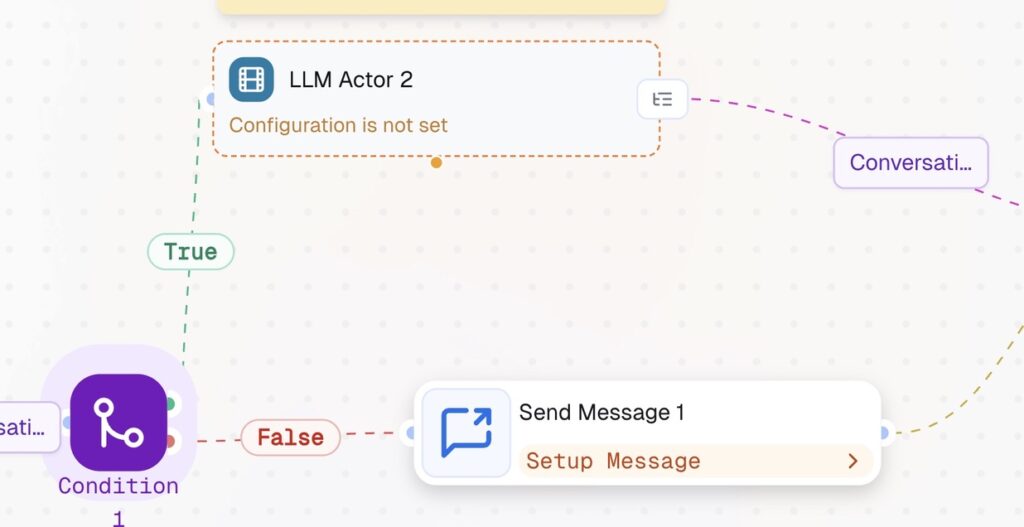
Node: LLM Actor
Add a second LLM Actor on the True path from Condition 1. Open the node settings and configure the following:
Node Name: rename to “Job Qualification – SMS.”
Model: select the same model you used in LLM Actor for consistency.
System Instructions: this is the AI that actually talks to the caller to understand what they need. Paste the following:
“You are a friendly assistant for [Business Name]. A customer has replied to your missed call message. Your job is to collect four pieces of information through natural SMS conversation: what is the issue or service needed, what is the address, how urgent is it, and what is a good time for a callback or visit. Ask one question at a time. Keep messages short – this is SMS, not email. If the customer asks about pricing, availability, or scope of work, say: ‘A team member will cover that when they call you back – let’s get your details sorted first.’ Once you have all four pieces of information, end the conversation.”
You can use “Use Variables +” to pass in the caller’s previous message from LLM Actor 1 so the conversation feels continuous rather than starting from scratch.
Exit Conditions: click “+ Add Condition” and add two:
“All four pieces of information have been collected – issue, address, urgency, and preferred time.”
“Customer stops responding or says they no longer need help.”
This ensures the LLM Actor hands off cleanly to the next node once qualification is complete, rather than continuing to loop.
Built-in Skills: leave collapsed – not needed for this step.
Hit Save.
Node: LLM
Add an LLM node after LLM Actor. This is not a conversational node – it runs once, reads the conversation that just happened, and pulls out structured data for the routing node to use.
Label this node: “Extract Details.”
Model: select the same model used in the previous nodes.
System Instructions: describe what the AI should do with the data:
“You are a data extraction assistant. Read the conversation provided and extract the following fields: issue (what the customer needs), address (where the job is), urgency (classify as Urgent, Standard, or Low), and preferred_time (when the customer is available). Return only the extracted values. Do not add commentary.”
Messages Input: toggle this ON. This connects the node to the conversation from the Channel Dispatcher, passing in the full SMS exchange from LLM Actor as context. Without this, the node has no conversation to read.
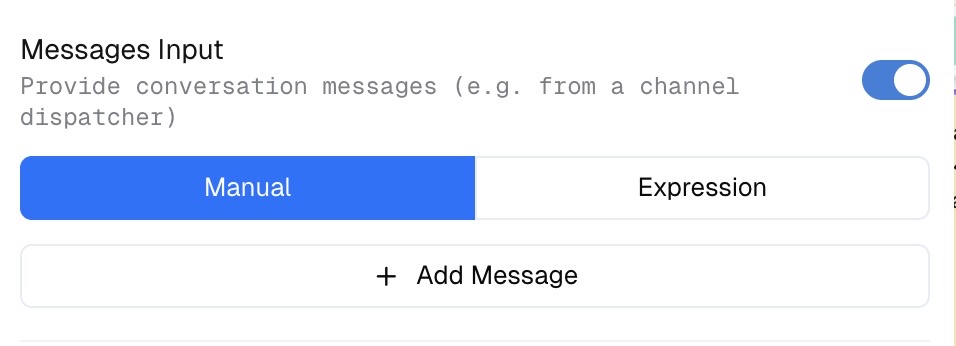
User Instructions: paste the specific extraction task:
“Extract issue, address, urgency, and preferred_time from the conversation above. Urgency must be one of: Urgent, Standard, or Low.”
File Attachments: leave off – not needed.
Structured Output: click Configure. Define the described above fields separately: address, urgency, preferred time, etc.
This is the critical setting – without Structured Output configured, you will not have a clear output.
Hit Save.
Node: Multi-Condition
Add a Multi-Condition node after LLM. Open the node settings and configure the following:
Node Name: rename to “Route by Urgency.”
Model: leave as default unless you have a preference – the default model is sufficient for condition evaluation.
Simplified Workflow Context: leave unchecked. You need the model to have access to execution history and variables from LLM, including the {{urgency}} output. Checking this would cut off that context and make routing unreliable.
Path 1 – Urgent: Click the pencil icon to rename it “Urgent.” In the Condition field write:
“Go this path when the urgency extracted from the conversation is Urgent – the customer used words like no heat, flooding, burst pipe, gas leak, no power, or alarm.”
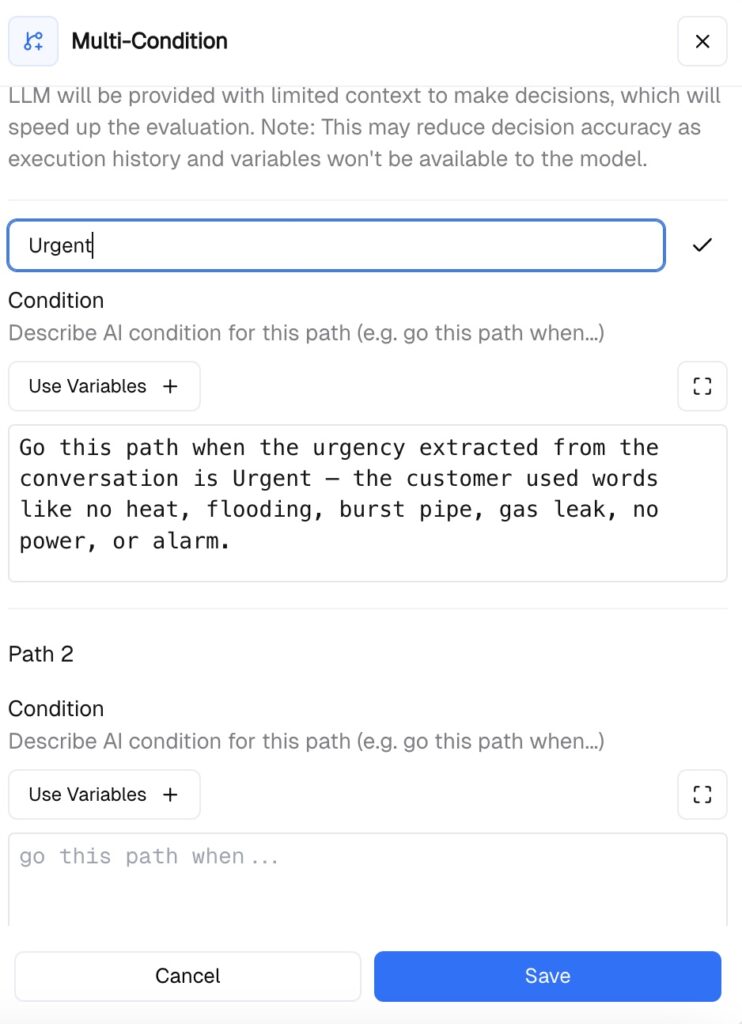
Path 2 – Standard: In the Condition field write:
“Go this path when the urgency extracted from the conversation is Standard – the customer has a clear job request but no emergency keywords.”
Path 3 – Low: In the Condition field write:
“Go this path when the urgency extracted from the conversation is Low – the request is vague, non-urgent, or the customer has not provided enough detail to classify the job.”

Node: App Action
Add an App Action node on Path 1 from the Multi-Condition node. This node fires an immediate push notification or call to the on-call technician the moment an urgent job is detected.
Node Name: rename to “Urgent Alert – Push Now.”
Connect app: click “+ Connect” and select your notification app – this could be a push notification service, a phone call trigger, or a messaging platform like Slack or WhatsApp depending on how the business owner or on-call tech prefers to be reached.
Configure the setup based on the notification channel.
Hit Save.
Nodes: HTTP Request -> LLM Actor
Add an HTTP Request node on Path 2. Configure it to call the Calendly API and retrieve available booking slots. The Conversational AI node then sends an SMS with the available time options pulled from the calendar. The customer replies with a choice. CogniAgent confirms and writes the appointment back. All via SMS – no app, no link, no friction.
After the HTTP Request, add LLM Actor. This node handles the booking conversation – it presents the slots, processes the customer’s choice, and confirms the appointment.
Node: Send Message
Add a Send Message node on Path 3. This fires a single message to low-priority leads – typically something like “Thanks for reaching out – we’ll be in touch within 24 hours to arrange a time.” Then the workflow proceeds to the close.
App Action (one node) – Logging all to CRM: connect all three paths here and configure your CRM app – HubSpot, JobNimbus, or equivalent. Map the required variables into the record.
App Action (another node) – Notification of the Business Owner: wire directly from App Action. This fires only after the CRM record has been written. Connect your notification app and send a plain-text summary to the owner:
“New lead: [issue] [address] [urgency] [outcome].”
Hit Save on both.
You’ve built it!
A missed call now triggers a 30-second SMS, an AI qualifies the lead, routes it by urgency, books the slot or fires the alert, logs everything to CRM, and notifies the owner – all without anyone picking up the phone.
Next step: pair this with the Automated Follow-Up Sequence. 50% of conversions happen after the second or third contact – which almost never happens without automation.